Progress Bar

Skip to main content

Jaycar
...

How to Make a Thermal Fan Control
How to Make a Thermal Fan Control

Difficulty
hero-PageImage-800x600.jpg

Summary

The fans in practically all modern desktop PCs are thermally controlled. This means that they are only turned on when needed, usually when the PC’s internal temperature gets too high. The fans can turn on when the temperature rises, moving hot air and replacing it with cooler air. Some PCs can even run the fans at different speeds, depending on the temperature.

Older PCs always had their fans running at full speed. Being able to control them means that noise is kept down and the wear and tear on the fans is minimised.

This project has a similar function; it provides automatic control of a fan based on temperature and can be adjusted to work at different temperatures, but it doesn’t require a microcontroller. It could be useful, for example, to power a ventilation fan in a room if the temperature inside that room gets too high.

We use the Jaycar XC4494 Temperature Sensor Module to sense the ambient temperature and the Jaycar XC4488 Mosfet Module to switch the fan (or other low-voltage DC load) on and off.

The Temperature Sensor Module produces an analogue voltage that depends on the temperature. We apply that voltage to a simple comparator chip that produces a high or low level output, depending on whether the analogue voltage is above or below a set level.

Materials Required

1Duinotech Arduino Compatible 24V 5A MOS Driver ModuleXC4488
1Duinotech Arduino Compatible Temperature Sensor ModuleXC4494
180mm 12V DC FanYX2512
112V DC 500mA Power Supply 2.1mm DC PlugMP3011
1Arduino Compatible Breadboard with 400 Tie PointsPB8820
12.1mm DC Socket with Screw TerminalsPA3713
110k Ohm Linear (B) Single Gang 16mm PotentiometerRP7510
1LM311 Voltage Comparator Linear ICZL3311
1100nF 100VDC MKT Polyester CapacitorRM7125
1100uF 25VDC Electrolytic RB CapacitorRE6140
1220 Ohm 0.5 Watt Metal Film Resistors - Pack of 8RR0556
11M Ohm 0.5 Watt Metal Film Resistors - Pack of 8RR0644
18 Pin Production (Low Cost) IC SocketPI6500
1Jumper Lead Mixed Pack 100 PiecesWC6027
 Fig1-1200x600.jpg

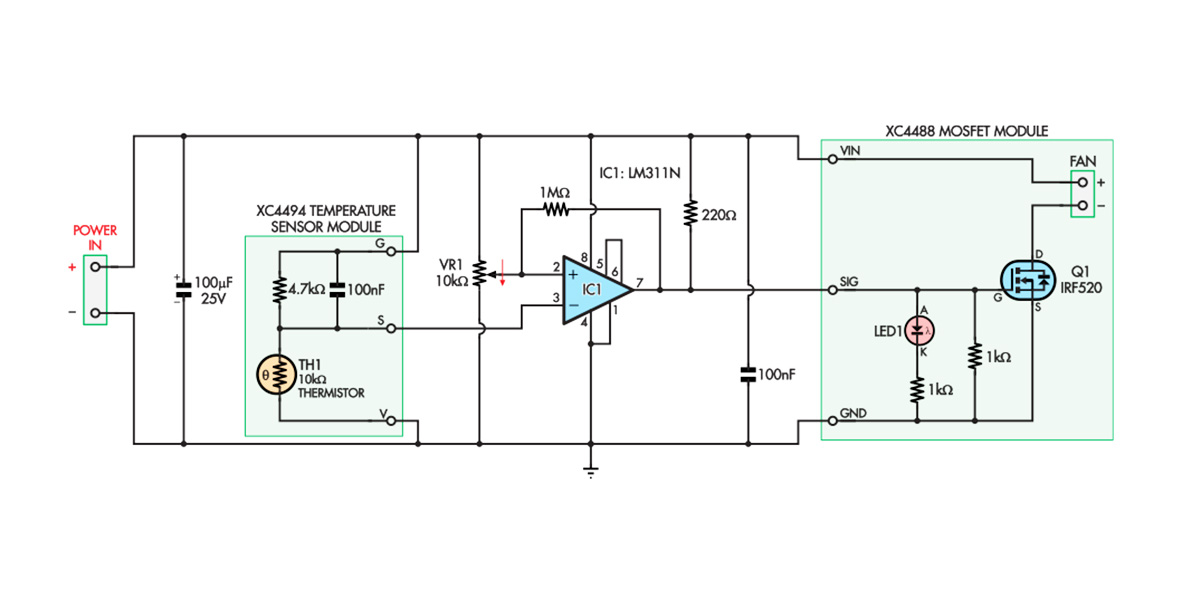
Fig.1 shows the resulting circuit. Note the two boxes that correspond to the two modules. The circuitry and components in those boxes come pre-soldered to the module when you buy it.

One advantage of this analogue approach is that we can run all the circuitry from 12V DC rather than needing to generate a lower voltage to run a microcontroller. That reduces the necessary parts and simplifies the design. The parts we’re using will happily run from 5V up to 18V.

IC1 is a comparator. In simple terms, when the voltage at + pin (pin 2) is higher than the – pin (pin 3), output pin 7 ‘floats’ and is pulled up to 12V by current from the 220Ω resistor. The rest of the time, when the + voltage is lower than the – voltage, IC1 internally connects pin 7 to pin 1, where pin 1 is at 0V (ground).

That means the output is 12V when the + voltage is higher than the other, or at 0V when the + voltage is lower.

By connecting the pin 7 output to the SIG line of the Mosfet Module, the Mosfet switches on when the voltage at pin 7 is 12V, and when the Mosfet is on, it powers the fan.

VR1 is a potentiometer that provides our voltage/temperature setpoint; the wiper voltage can be adjusted between 0V and 12V by rotating the shaft on top. This adjustable voltage is applied to pin 2 of IC1. Thus, IC1 compares the VR1 setting to the voltage from the Temperature Sensor Module, so adjusting VR1’s screw lets you set the temperature at which the output will switch.

Hang on – isn’t it backwards?

While the S pin of the Temperature Sensor Module connects to pin 3 of IC1, its V pin is connected to ground (0V), and the G pin is connected to the 12V supply. That might seem backwards, but the Temperature Sensor module is just a group of passive components, none of which care about polarity, so we’re free to connect it this way.

When wired this way, an increasing temperature causes a decreasing voltage at the S pin. VR1 is also wired ‘backwards’, so that turning the screw clockwise reduces the wiper voltage, to match the behaviour of the Temperature Sensor Module.

The reason for doing it this way is to allow us to provide predictable hysteresis. That is the purpose of the 1MΩ resistor. When IC1’s pin 7 is high, some current flows through the 1MΩ resistor, raising the potentiometer wiper voltage slightly.

Since VR1 is wired backwards, this is the same as reducing the setpoint slightly, meaning that the temperature has to drop a little after the fan switches on before it switches off. That stops it from ‘juddering’ on and off rapidly when the ambient temperature is hovering near the switching setpoint.

If we had wired the circuit up the ‘normal’ way, the hysteresis current would have to be applied to the input connecting to the S terminal of the Temperature Sensor Module. The filter capacitor in that module would have delayed the hysteresis, making it much less effective, as we found in one of our early prototypes!

By reversing the connections to the trimpot and Temperature Sensor module and swapping those inputs, the output of IC1 behaves the same. However, the hysteresis problem is solved, as no capacitor is connected to the trimpot wiper.

The remaining components are 100nF and 100µF supply bypass capacitors that stabilise the circuit by smoothing out any changes to the incoming supply voltage.

noFan-PageImage-800x600.jpg

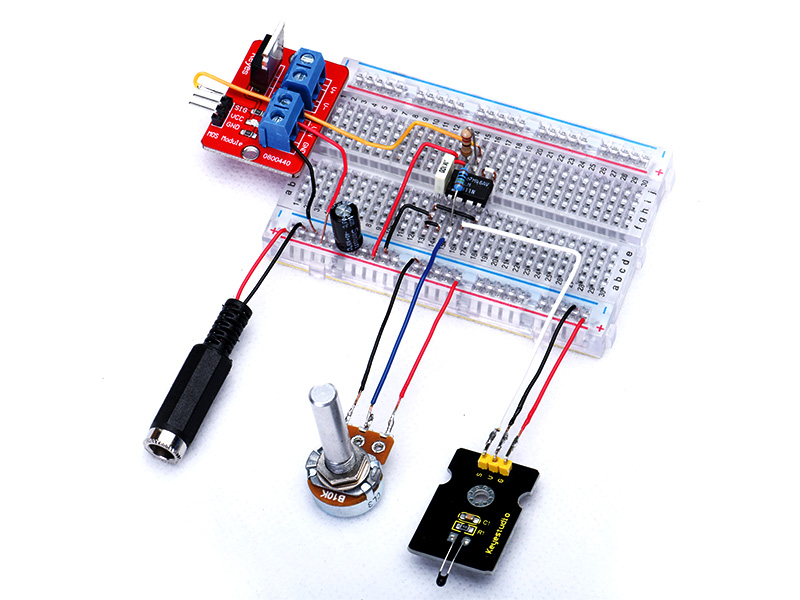
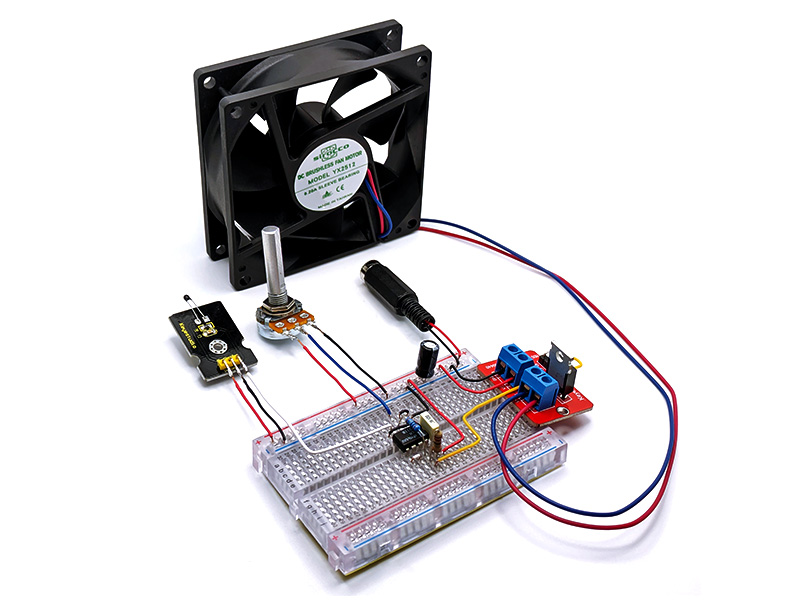
We built our prototype on a PB8820 solderless breadboard. Still, the design is well-suited to the HP9570 prototyping board, which has an identical layout and will provide a more robust and permanent result. We soldered short lengths of wire to the modules to make for a neat layout. If you prefer not to solder, the circuit will work with jumper wires but may not be as tidy.

In our photos, all red wires connect to the 12V supply and all black wires go to 0V. Use the photos and circuit diagram to wire yours up like ours.

We placed the 1MΩ resistor on top of IC1, as it connects between pins 2 & 7. Also, the 220Ω resistor has had its lead bent by 180° so that it can be wired to two adjacent rows, connecting to both pins 7 and 8 of IC1.

We used a soldered DC socket to supply power, but you could use the Jaycar PA3713 screw terminal version if you prefer. Leave the fan off for testing, since the Mosfet Module has an indicator LED that shows whether it is on or off.

We used a 12V DC plugpack for power, but a 9V battery (connected using a PH9251 battery snap to 2.1mm plug) should be fine for initial testing. If you start with VR1 fully anti-­clockwise, the LED should be on initially. It should go off at some point as you rotate VR1 clockwise.

If the LED works in reverse or isn’t switching on and off as VR1 is adjusted, check your wiring before connecting the fan.

Turn VR1 anti-clockwise until the LED is on, then turn it back until it just goes off. If you now touch the Temperature Sensor Module’s thermistor, the LED should switch on as the thermistor registers a higher temperature (assuming the ambient temperature is lower than your body temperature!).

After a while (depending on the settings and ambient temperature), the LED will switch off. In that case, all is well, and you can connect the fan and adjust VR1 for a suitable switch-on threshold.

That would be easiest to do if the thermistor were exposed to a temperature close to your desired threshold, eg, by heating a bit of metal and then holding it against the thermistor. Let it stabilise, then adjust VR1 until the fan just switches on at that temperature.

If a DC motor is connected to the output (rather than a BLDC fan), a back-EMF quenching diode needs to be connected across it to avoid damaging the Mosfet at switch-off.

The comparator was one of the first integrated circuits, appearing around 60 years ago. Even modern microcontrollers often include one or more among their internal peripherals. This project is a great example of how a simple chip like a comparator can interface to analog and digital modules, and perform a role often delegated to more complex devices.

hero-PageImage-800x600.jpg

This article appeared in the May 2024 issue of Silicon Chip Magazine. Check out their website for other project ideas: https://www.siliconchip.com.au/

Similar projects you may be interested in